This is a color challenge, we are allowed the 3 chosen colors and one neutral color. I choose Black as my neutral. Other colors are: Real Red, Primrose Petals, Pool Party.
I have been waiting for a chance to use my new tiny Petite Curly label punch, I just love that shape and it's so cute with the larger version and the darling stamp set make for it. This tiny Curly label punch is only available for free with a $50 order during SAB (Sale-a-Bration). You can find all the catalogs HERE.
Supplies for this card
Curly label punch (119851)
Petite Curly label punch Free with $50 order during SAB
Honeycomb embossing folder Spring Catty (129378)
Pretty Petites Stamp set Free with $50 order during SAB
Field flowers stamp set (sentiment) Wood (122760) Clear (122762)
Tag die cut (Hearts a flutter stamp and die bundle) spring catty Wood(131098) Clear (131097)
Pool Party Ribbon (Free SAB item, comes with 3 colors ribbon and buttons.
Pearls (119247)
Remember, you can get one free item or set of items out of the Sale-a-bration flyer for each $50 you spend on other supplies.
If you would like to shop now, GO HERE
Showing posts with label Kraftycat. Show all posts
Sunday, February 10, 2013
Monday, December 17, 2012
Mojo Monday 272
I am loving this sketch, how fun is this? I kept it fairly simple I think, but added in some fun elements
Colors:
Whisper White
Real Red
Supplies:
Papillion Potpourri #123757 Wood, #123759 Clear
Elegant Butterfly punch #127526,
1 inch square punch #124094
Fancy Fan embossing folder #127751
Rhinestones #119246
Ribbon I have to admit to using a retired ribbon, Christmas wiped me out of red ribbon. The 1/8th inch taffeta ribbon would have been excellent on this. #119251. At least that's what I would have used.
For layering I cut the red on top of the white card 1/8th inch smaller then the card, and cut the white 1/8th inch smaller then the red, and embossed it.
Be sure to watch for the new butterfly punch coming in the spring catty, it is sized for the smaller butterflys in this set.
So, here is the sketch:
Have a great week!
Labels:
Cattaildesigns,
Kraftycat,
MojoMonday272,
Stampin Up
Monday, November 26, 2012
Mojo Monday 269
I used todays sketch for another Christmas card, I really love how it came out. Here is the sketch today, afraid I didn't stay completely true to the sketch, but...........
Colors:
Raspberry Ripple (In color)
Whisper White
Brushed Gold cardstock. #102935
Supplies:
Cherry Cobbler Embossing powder #122949
Festival of Prints DSP, (Holiday catty) This pad comes in 4 1/2 x 6 1/2, so very usable for cards.
#126904
Rhinestones. #119246
Delicate Doilies Sizzlits L die. It makes 3 different doilies at one time # 126999
Northern Flurry Embossing Folder #120902
Perfect Dots Embossing Folder #117335
Ornament Keepsakes Bundle, has stamps and die cuts for the several ornaments. Clear #129950
2 1/2 inch circle punch #120906
Gold Stampin Dazzle marker (Holiday) #128979
The gold CS doesn't show well in the photo, but it's gorgeous when you see it. I used the gold Dazzle marker to go around the cut out ornament where it was white.
I punched out my circle, then inked the edges and ran it through the embossing folder placing it right over the large snowflake.
Thanks for visiting, have a great week.
Labels:
Cattaildesigns,
Kraftycat,
MojoMonday269,
Stampin Up
Saturday, November 24, 2012
A pretty and simple Chrismas Card
I love how simple and quick this one was to make, but it's one I'll be proud to send out.
Colors:
Cherry Cobbler
Wild Wasabi
Whisper White
Supplies:
Seasonal Saying, Christmas Available as a single stamp or in the set
Pretty Petals embossing folder
Labels Collection Framelit dies
Cherry Cobbler seam binding.
I used the Wild Wasabi as the first layer, then embossed my piece of white. I ran the brayer over the Cherry Cobbler ink pad until it was covered then over the top of the embossed white. Cut your two pieces out of the Labels framelits, stamp on the white top, and layer together. Wrap the seam binding over top and to the back for an inch or so on either side, of the embossed piece and glue it all together.
Hope you enjoy this and that it gave you some ideas for your own cards.
Tuesday, November 20, 2012
Just another Christmas Card
I hope you all are enjoying all these Christmas cards, I'm having a lot of fun making them. Usually I make just one and make lots of them, so this is different for me too. But it's a lot of fun sharing them as I go.
I made one a couple days ago that I just fell in love with, my favorite color is blue, often I have to stop myself from using nothing but blue.
Colors:
Bashful Blue
Marina Mist
Whisper White
Supplies:
Snow Swirled stamp set (127799) Clear
White craft ink pad (101731)
White embossing powder (109132)
Sizzlits Delicate Doilies (126999)
1 inch circle punch (119868)
En Francias background stamp (109521)
Ornament Keepsakes stamp set (top circle) (128051) bundle (129950) includes die cuts and clear mounts.
White Organza ribbon (114319)
Embellished Events (sentiment) (126497) clear
Thanks for looking.
I made one a couple days ago that I just fell in love with, my favorite color is blue, often I have to stop myself from using nothing but blue.
Colors:
Bashful Blue
Marina Mist
Whisper White
Supplies:
Snow Swirled stamp set (127799) Clear
White craft ink pad (101731)
White embossing powder (109132)
Sizzlits Delicate Doilies (126999)
1 inch circle punch (119868)
En Francias background stamp (109521)
Ornament Keepsakes stamp set (top circle) (128051) bundle (129950) includes die cuts and clear mounts.
White Organza ribbon (114319)
Embellished Events (sentiment) (126497) clear
Thanks for looking.
Labels:
Cattaildesigns,
Kraftycat,
Ornament Keepsakes,
Snow Swirled,
Stampin Up
Friday, November 16, 2012
Pretty Pink Petals
I thought I'd mix it up today. This could be most any kind of card, birthday, Love, whatever.
I started with Whisper White CS, added a Pink Piroette layer, then a Tempting Turquoise layer. I used the Fancy Fan embossing folder on part of the final Whisper White layer, leaving a clean space for my flowers.
They were created using the BoHo Blossoms punch, adding a brad in the center and a Pretty In Pink Scallop Spotted ribbon.
Cut one Pink Piroette from the Decorative Label punch and add sentiment from Petite Pairs stamp set.
Cut second Decorative Label from Tempting Turquoise, cut in half and layer under the Pink one.
That is pretty much it, quick and easy.
To order SU from me, click HERE
Labels:
BoHo Blossoms,
CAS,
Cattaildesigns,
Decorative Label,
Kraftycat,
Stampin Up
Monday, November 12, 2012
MoJo Monday 267
Here we are again, week 267 for the Mojo Monday challenge. Probably no surprise I have another Christmas card for you. At this rate, I'll have mine all done soon.
Very simple card to make and I kept pretty close to the sketch this week too. I've been looking for an excuse to use that snowflake embossing folder, it's part of a set of small folders called Delicate Designs and has a matching die cut.
Colors
Real Red, ink 126949 paper 102482
Baja Breeze ink126960, paper 111352
Whisper White paper 100730
Other supplies
Embellished Events Stamp set wood 126495, clear 126497
Snow Festival Designer Series Paper (Holiday Catty) 126908
Delicate Designs Embossing Folder 127023
Snow Swirled stamp set (snowflake) wood, 111690 clear 127799
Real Red Grosgrain ribbon
Scallop Edge Border, 119882
Thanks for stopping by.
Labels:
Cattaildesigns,
Christmas,
Kraftycat,
MojoMonday267,
Stampin Up
Saturday, November 10, 2012
Day 10 of the Ten Days of Christmas, an Ornament
I promised you something special today and here it is.
I had an ornament exchange with some friends. Originally I planned on just using a couple of the rosettes back to back with ribbon in between, but it just grew on me. Then I planned to stop after the back side red piece, but then I got the doily and I had the gold paper so it just grew again.
Supplies:
Brushed Gold cardstock. #102935, Page 160
Paper Doily Sizzlits L die #125592, Page 191
Fun Flowers Bigz L die. #121812, Page 193
Designer Series Paper stacks #117152 Page 154 In Subtles
1 3/4 Inch Scallop round punch # 119854, Page 184
Postage Stamp punch, #122344, Page 182
Floral Frames Framelits #127012, Page 191 (used the smallest one, in gold at the very top)
1/4 inch Stitched Grosgrain ribbon in Real Red, #126875
Pearl basic Jewels #119247 Page 175
Simply Scored tool, #122334 or
New SU Trimmer, #126889
There is a Designer Rosette Bigz XL die, but in this case I just made my own.
Instructions for the rosette:
You can use the Simply Scored scoring tool or the trimmer with 1/4 inch marks. The new SU trimmer works great for this, it has both the cutting and scoring blades parked on it at all times.
Cut your strip for the rosette 9 3/4 inches long by 1 1/2 inches wide. Make it 1/4 inch wider if you want to use an edge punch on one edge.
Score every 1/4 inch down the length of the strip, do a fan fold on score lines all the way down the strip, then glue the ends together.
Using a glue gun, you will need to glue it together down the center. First, take the circle you've made, pressing down and toward the center make it lay flat, glue down that middle. You can use a 1 inch punched circle to help hold it and add a finishing touch if you like.
Don't feel like you have to use every tool I have, look around you at what you and and see what you can put together. I hope you enjoyed this and it gives you ideas of your own.
I had an ornament exchange with some friends. Originally I planned on just using a couple of the rosettes back to back with ribbon in between, but it just grew on me. Then I planned to stop after the back side red piece, but then I got the doily and I had the gold paper so it just grew again.
Supplies:
Brushed Gold cardstock. #102935, Page 160
Paper Doily Sizzlits L die #125592, Page 191
Fun Flowers Bigz L die. #121812, Page 193
Designer Series Paper stacks #117152 Page 154 In Subtles
1 3/4 Inch Scallop round punch # 119854, Page 184
Postage Stamp punch, #122344, Page 182
Floral Frames Framelits #127012, Page 191 (used the smallest one, in gold at the very top)
1/4 inch Stitched Grosgrain ribbon in Real Red, #126875
Pearl basic Jewels #119247 Page 175
Simply Scored tool, #122334 or
New SU Trimmer, #126889
There is a Designer Rosette Bigz XL die, but in this case I just made my own.
Instructions for the rosette:
You can use the Simply Scored scoring tool or the trimmer with 1/4 inch marks. The new SU trimmer works great for this, it has both the cutting and scoring blades parked on it at all times.
Cut your strip for the rosette 9 3/4 inches long by 1 1/2 inches wide. Make it 1/4 inch wider if you want to use an edge punch on one edge.
Score every 1/4 inch down the length of the strip, do a fan fold on score lines all the way down the strip, then glue the ends together.
Using a glue gun, you will need to glue it together down the center. First, take the circle you've made, pressing down and toward the center make it lay flat, glue down that middle. You can use a 1 inch punched circle to help hold it and add a finishing touch if you like.
Don't feel like you have to use every tool I have, look around you at what you and and see what you can put together. I hope you enjoyed this and it gives you ideas of your own.
Wednesday, November 7, 2012
Day 7 of the Ten Days of Christmas
This is such a pretty and easy card. Snow Swirled is my favorite Christmas set of the year, but I just love swirly graphics.
Start with Midnight Muse card stock, layer Whisper White, then with the top layer of Midnight Muse, Stamp and emboss both the tree and the sentiment ( Curly Cute set). Use Silver embossing powder. Put the ribbon/bow on before attaching so you can tuck the ends under and add on the rhinestones to the tree.
That's it, done!
I have something special for you on day 10 that I just know you will enjoy. I can hardly wait.
Hope you will come back tomorrow for day 8.
Start with Midnight Muse card stock, layer Whisper White, then with the top layer of Midnight Muse, Stamp and emboss both the tree and the sentiment ( Curly Cute set). Use Silver embossing powder. Put the ribbon/bow on before attaching so you can tuck the ends under and add on the rhinestones to the tree.
That's it, done!
I have something special for you on day 10 that I just know you will enjoy. I can hardly wait.
Hope you will come back tomorrow for day 8.
Tuesday, November 6, 2012
Day 6 of the Ten Days of Christmas
Welcome to day 6, this has been fun for me, hope you all are enjoying it too. On the bigger plus side, I'm getting all my Christmas cards done. How are you coming with yours?
Today I have a very clean and simple card for you. The red strip was made using a wheel. Not even a Christmas wheel, it's called Daydreams, good all year long.
TIP: Don't worry about ink colors for wheels if you don't have what you need. Simply run the wheel over a stamp pad until it's inked up well.
Cut and fold your card, ink up your wheel, using a ruler or other straight line, run the wheel across a piece of CS. Cut close to edges, layer a piece of black a 1/2 inch larger. That gives you 14in top and bottom, before you glue them together wrap your ribbon tucking a small amount under each end. Glue it all down.
Stamp sentiment, I cut it out using my Bigshot and the Labels Collection Framelits, but you can use whatever punch or die cut you have that will fit your sentiment. Cut a second one the same out of black, layer them letting the black show a bit. Tie a bow and place under the sentiment. I colored in the ornament in the sentiment using a Dazzle marker.
That's it for this one.
Colors:
Cherry Cobbler
Whisper White
Basic Black
Tools and accessories:
Cherry Cobbler seam binding
Daydreams wheel
Labels coll framelits dies
Word Play stamp set
Gold Dazzle marker
To place an order, you can go HERE
Hope to see you tomorrow for day 7.
Today I have a very clean and simple card for you. The red strip was made using a wheel. Not even a Christmas wheel, it's called Daydreams, good all year long.
TIP: Don't worry about ink colors for wheels if you don't have what you need. Simply run the wheel over a stamp pad until it's inked up well.
Cut and fold your card, ink up your wheel, using a ruler or other straight line, run the wheel across a piece of CS. Cut close to edges, layer a piece of black a 1/2 inch larger. That gives you 14in top and bottom, before you glue them together wrap your ribbon tucking a small amount under each end. Glue it all down.
Stamp sentiment, I cut it out using my Bigshot and the Labels Collection Framelits, but you can use whatever punch or die cut you have that will fit your sentiment. Cut a second one the same out of black, layer them letting the black show a bit. Tie a bow and place under the sentiment. I colored in the ornament in the sentiment using a Dazzle marker.
That's it for this one.
Colors:
Cherry Cobbler
Whisper White
Basic Black
Tools and accessories:
Cherry Cobbler seam binding
Daydreams wheel
Labels coll framelits dies
Word Play stamp set
Gold Dazzle marker
To place an order, you can go HERE
Hope to see you tomorrow for day 7.
Monday, November 5, 2012
Mojo Monday 266 and Day 5 of the 10 days of Christmas
Since I am in the middle of the 10 Days of Christmas here, I of course, had to do a Christmas card for the challenge.
I simplified it just a little bit, with the busy background and A2 card size, I didn't want too much on it. I used
Whisper White
Cherry Cobbler
Snow Festival Designer Paper pack from the Holiday catty
Certainly Celery
Layer the DSP over the white CS, cut your white tag, then slightly smaller the certainly celery tag and glue together. Cut a white square, layer a slightly smaller Cherry Cobbler square over top. Stamp out the pointsettia from Water Color Winter, punch out using the 2 3/8 in scalloped round. I inked the edges and also used a blender brush to color in.
TIP: With the new stamp pads be sure to wipe some off after putting the tip of the brush in the pad, for the inside coloring. You can leave it for the vanes and outside edge.
Stamp sentiment from Snow Swirled. Attach the scallop round using Stampin Dimensionals. and attach to card.
See you tomorrow!
I simplified it just a little bit, with the busy background and A2 card size, I didn't want too much on it. I used
Whisper White
Cherry Cobbler
Snow Festival Designer Paper pack from the Holiday catty
Certainly Celery
Layer the DSP over the white CS, cut your white tag, then slightly smaller the certainly celery tag and glue together. Cut a white square, layer a slightly smaller Cherry Cobbler square over top. Stamp out the pointsettia from Water Color Winter, punch out using the 2 3/8 in scalloped round. I inked the edges and also used a blender brush to color in.
TIP: With the new stamp pads be sure to wipe some off after putting the tip of the brush in the pad, for the inside coloring. You can leave it for the vanes and outside edge.
Stamp sentiment from Snow Swirled. Attach the scallop round using Stampin Dimensionals. and attach to card.
See you tomorrow!
Saturday, November 3, 2012
Ten days of Christmas, day 3.
I love the old fashioned look of this set of stamps, and the sentiment is beautiful and really adds to the card.
I wanted to keep the traditional feel of the holidays so mostly used neutral colors.
Always Avocado, Crumb Cake, Soft Suede, Real red
Taffeta ribbon, Christmas Lodge stamp set, Scallop border punch.
This is a quick and easy card, have fun with it, see you tomorrow.
I wanted to keep the traditional feel of the holidays so mostly used neutral colors.
Always Avocado, Crumb Cake, Soft Suede, Real red
Taffeta ribbon, Christmas Lodge stamp set, Scallop border punch.
This is a quick and easy card, have fun with it, see you tomorrow.
Friday, November 2, 2012
Day 2 of Ten Days of Christmas
This is a standard A2 card, I used this size most of the time. They fit in the envelops we all have for cards and it's just easier all the way around. Also, I send cards to OWH (Operation Write Home) those are hand made cards that go to our troops so they can send cards home to friends and loved ones. And this is the size they need to be for that.
Colors:
Whisper White, Brushed Gold, Marina Mist
Other supplies: En Francais background stamp, Labels Collection Framelits die cut set, gold embossing powder, Polka dots embossing folder, Keepsakes Ornaments stamps and Holiday Ornament framelits die set. Whisper White seam binding. Versamark ink pad
The ornament stamps and die cuts can be purchased in the Holiday catalog for a discounted price if bought together.
Cover your background stamp with ink from the Versamark ink pad, the easy way is to lay the stamp down face up and pat over it with the ink pad. Stamp onto your Brushed gold paper cut slightly smaller then the card. Quickly pour embossing powder over stamped image and when done tap to get any extra powder off the card. Heat with an embossing gun.
TIP: If you haven't embossed before, hold the image toward a light source, a window during day time is fine, and watch it as you heat, soon as an area turns shiny it's done, move around the image until it's all shiny. It's easy to heat too much and then the embossing will just disappear, so be careful.
Stamp and cute out your ornament, select a Label die that will work for the size of your ornament, run it through the embossing folder, also die cut a gold ornament and layer the die cuts together, attach to the card using Dimensionals. Cut a piece of seam binding to fit around the front of the card, and to the back an inch or so on either side, glue down. Stamp Sentiment to a one inch strip. The ends were cut using a one inch round punch, attach.
I hope I've sparked some ideas, see you tomorrow.
Colors:
Whisper White, Brushed Gold, Marina Mist
Other supplies: En Francais background stamp, Labels Collection Framelits die cut set, gold embossing powder, Polka dots embossing folder, Keepsakes Ornaments stamps and Holiday Ornament framelits die set. Whisper White seam binding. Versamark ink pad
The ornament stamps and die cuts can be purchased in the Holiday catalog for a discounted price if bought together.
Cover your background stamp with ink from the Versamark ink pad, the easy way is to lay the stamp down face up and pat over it with the ink pad. Stamp onto your Brushed gold paper cut slightly smaller then the card. Quickly pour embossing powder over stamped image and when done tap to get any extra powder off the card. Heat with an embossing gun.
TIP: If you haven't embossed before, hold the image toward a light source, a window during day time is fine, and watch it as you heat, soon as an area turns shiny it's done, move around the image until it's all shiny. It's easy to heat too much and then the embossing will just disappear, so be careful.
Stamp and cute out your ornament, select a Label die that will work for the size of your ornament, run it through the embossing folder, also die cut a gold ornament and layer the die cuts together, attach to the card using Dimensionals. Cut a piece of seam binding to fit around the front of the card, and to the back an inch or so on either side, glue down. Stamp Sentiment to a one inch strip. The ends were cut using a one inch round punch, attach.
I hope I've sparked some ideas, see you tomorrow.
Thursday, November 1, 2012
PPA146 and Day one of the 10 Days of Christmas
Thanks for coming by, this morning I'm posting a PPA color challenge, and making it my first day of my Ten days of Christmas, come back tomorrow for day 2.
We were to use Stampin Up colors Crumb Cake, Very Vanilla, and Robin Hood Red.
I choose a different size this time. I have a bunch of red #10 envelops sitting here I bought for 50 cents after christmas at an office store and I sometimes look for ways to use them. Here is my result.
We were to use Stampin Up colors Crumb Cake, Very Vanilla, and Robin Hood Red.
I choose a different size this time. I have a bunch of red #10 envelops sitting here I bought for 50 cents after christmas at an office store and I sometimes look for ways to use them. Here is my result.
Colors:
Crumb Cake, Very vanilla, Robin Hood Red.
Tools:
Scallop trim border punch, 2 3/8 inch scallop round punch, and the 2 1/2 inch round punch.
Stamp sets:
Four Seasons hostess set, Sentiment is from Christmas Lodge.
Cut your Very Vanilla 8" x 9 1/8", fold to make a 4 x 9 1/8" card.
Cut a piece of Crumb Cake the length of the card by 3 inches, then cut a matching size border and glue together. cut a 1 1/2" piece of the red, and wrap the ribbon, I used s slightly darker ribbon in Soft Suede, I also used Soft Suede for the sentiment.
Stamp the bird graphic from Four Seasons and punch using the scallop punch, cut a red piece using the 1 1/2" round punch. Adhere using Stampin Dimensionals. Stamp Merry Christmas along the side. Stamp the snowflakes if desired. I used White.
See you tomorrow.
Monday, October 29, 2012
A big sale at SU, and Mojo Monday 265
Before I go any further, today and today only Monday, Oct 29th 2012, Stampin Up is having a one day sale like never before, every stamp and stamp set is on sale for 15% off! Exceptions are bundles, wheels and hostess sets. So hurry and place your order right now, just in time for your Christmas cards.
To order from me, go here.
Now, on to Mojo Monday. Love, love, love todays sketches, choices of round or square cards this week.
Here is the sketch.
Pretty neat huh? Now here is what I came up with early this morning.
To order from me, go here.
Now, on to Mojo Monday. Love, love, love todays sketches, choices of round or square cards this week.
Here is the sketch.
Pretty neat huh? Now here is what I came up with early this morning.
Colors:
Very Vanilla
Gumball green
Cherry Cobbler
Patterned paper:
Festival of Prints DSP (2 sheets in the pack come with a patterned side and a side with decorative squares.)
Snow Festival DSP, (comes in a 6 1/2x4 1/2 inch pad of double sided paper)
Stamp set:
Ornament Keepsakes ( In the Holiday catty) I used it for the small circle on top of the rosette, you can use anything you have.
At the center of this card is a square from Festival of Prints designer paper pack, also in the Holiday catty.
You will find it on my SU site available for download if you don't have it.
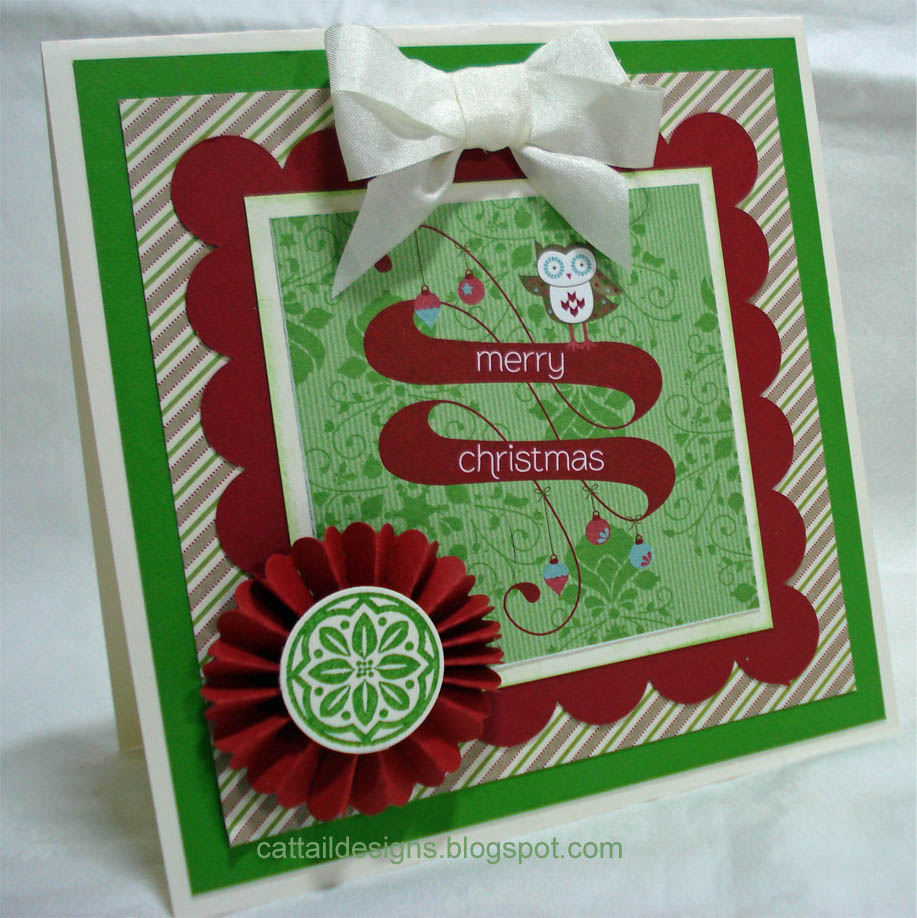
So, square card, very vanilla, Snow Festival paper cut to size, 4 3/9 inch scallop square, from the Bigz duo die, square cut of very vanilla with inked edges, then the square from the Festival of prints.
I added the rosette, I cut a 1 in wide by 9 inch long piece of cardstock, scored every 1/4 inch. (Super easy using the brand new SU cutter, avail Nov 1.) fold back and forth at each score, glue ends together. Set the rosette down, push in toward center until it lays flat and use a glue gun to hold right in the center.
Tip: Use the new Silicone mat available in the Holiday catty, the glue will peal right off.
I topped the rosette with the stamped circle, cutting it out with the 1In circle punch, and added the very vanilla seam binding for a bow.
Happy stamping. Thanks for stopping by.
Labels:
Cattaildesigns,
Christmas,
Kraftycat,
Mojo monday 256,
rosette,
Stampin Up
Wednesday, October 24, 2012
Simply elegant
A very simple and effective card, I made this one a birthday card, but it would work for other occasions.
Colors:
Perfect Plum
Whisper White
Other Elements:
Curly Cute Sentiment
Crochet Trim
Delicate Designs and Adorning Accents embossing Folders
Perfect Plum brads from the Regals Brad pack
All by Stampin Up
I hope you enjoy.
To order Stampin Up, go here:
Colors:
Perfect Plum
Whisper White
Other Elements:
Curly Cute Sentiment
Crochet Trim
Delicate Designs and Adorning Accents embossing Folders
Perfect Plum brads from the Regals Brad pack
All by Stampin Up
I hope you enjoy.
To order Stampin Up, go here:
Saturday, August 18, 2012
Midnight Muse and Certainly Celery
Wow, paired them together and they look like they were made for each other.
I started with Certainly Celery cardstock, used the SU dots embossing folder on both Certainly Celery and Midnight Muse, cut each to fit. I've been waiting for just the right time to use the Crochet trim, and I think it worked great here. I stamped the graphic from the Four Seasons stamp kit onto Very Vanilla and used the 2 1/2" circle punch, then the 3" circle punch on the midnight muse.
The sentiment was done cutting a rectangle out of both Certainly Celery and Very Vanilla then cut the ends with the scallop round punch. The sentiment is from Friendly Phrases.
I hope you give this color combo a try.
See you next time.
Thursday, August 16, 2012
PPA 141 Thank You card
I have a wonderful lady who invited me to do a class for her and some friends. They were only vacationing here and we had a wonderful time. I thought it would be really nice to just send her a little thank you. Now, I haven't ever done a workshop that I didn't have fun at, but this was a special
good time.
So, I had been playing with embossing folders the other day and had these two made up, so decided to use them. I hope you enjoy.
To get the color on the background of the embossed piece, I inked up my brayer using my Marina Mist ink pad, then rolled it across the background side of the folder before embossing. I am loving this idea and it looks great.
I used Marina Mist CS and Ink, and Daffodil Delight along with Whisper White. I also used the Dots and Petals embossing folders and the Hostess set Wacky Wishes for the sentiment. I rounded the corners on the bottoms of my strips and used a piece of Midnight Muse stitched ribbon, and the Decorative Label punch, I just love that punch!
Labels:
Cattaildesigns,
Kraftycat,
PPA 141,
Stampin Up,
Thank You card.
Monday, August 13, 2012
Mojo Monday 254
These Mojo Monday sketches are addicting. I am really enjoying it.
So, without further ado, here is mine for this week.
For this one I used Crumb Cake, Chocolate Chip, Island Indigo. Paper is from the Festival of Prints Designer series paper stack in the Holiday catalog. They come 4 1/2 x 6 1/2, I like that for making cards and very little waste.
Stamp sets I used the Postage Due, Elements of Style for the main graphic, And Field Flowers for the With Love.
So, without further ado, here is mine for this week.
For this one I used Crumb Cake, Chocolate Chip, Island Indigo. Paper is from the Festival of Prints Designer series paper stack in the Holiday catalog. They come 4 1/2 x 6 1/2, I like that for making cards and very little waste.
Stamp sets I used the Postage Due, Elements of Style for the main graphic, And Field Flowers for the With Love.
Thursday, August 9, 2012
Trying something new to me
I have been seeing cards with squares with 2 of the corners rounded off and I really like them. So, I decided to try it out for myself and this is what I came up with.
I used the petals (SU) embossing folder, cut it and used my brayer to apply Rose Red ink to half and Summer Starfruit to the other half. I then cut them into 1 1/2" squares and rounded off 2 corners on each. The red overlay is also Rose Red, the stripes are from the DSP paper pad in Subtles, and I used the pearls and Winter White seam binding. I punched out 2 butterflys from the Elegant butterfly punch, one in Rose Red and one in the DSP paper and added the smallest pearls from the pack.
It's pretty simple, hope you like it and maybe it gives you some ideas.
I'm finding a lot of uses for both the petals embossing folder and the butterfly punch, so they were excellent choices for me.
I used the petals (SU) embossing folder, cut it and used my brayer to apply Rose Red ink to half and Summer Starfruit to the other half. I then cut them into 1 1/2" squares and rounded off 2 corners on each. The red overlay is also Rose Red, the stripes are from the DSP paper pad in Subtles, and I used the pearls and Winter White seam binding. I punched out 2 butterflys from the Elegant butterfly punch, one in Rose Red and one in the DSP paper and added the smallest pearls from the pack.
It's pretty simple, hope you like it and maybe it gives you some ideas.
I'm finding a lot of uses for both the petals embossing folder and the butterfly punch, so they were excellent choices for me.
Labels:
Cattaildesigns,
Kraftycat,
New card idea,
Petals emb folder.,
Stampin Up
Subscribe to:
Posts (Atom)