Thursday, June 30, 2016

Stampin Up Pals Paper Arts challenge #307

Swirly Scribbles Thinlits!   My favorite set in the years annual catalog, and apparently many others as well. There is no shortage of samples.  It does make it a little difficult to come up with something different when using them and mine isn't so different, but helpfully not exactly like every other one you have seen.  It's such a fun set and I have lots more pieces I haven't played with just yet.

This week colors were chosen by our very own Brian King, 

I used watercolor paper for my top layer and watercolored the Pool Party background adding in some grunge in the form of splatter dots.  I used 2 die cuts putting one in the middle of the other, then cut some of the little flowers and leaves out using the dies for them.

For my sentiment I used the  Thoughtful Banners bundle, tons and tons of sentiments along with some banners to stamp and punch out. 

A pearl in the center of the middle flower and I was done.  Thanks for stopping by to look.  Here is the colors:


Tuesday, June 28, 2016

Stampin Up, MojoMonday454


To Mojo or  not to Mojo, that is the question.  :).  I couldn't make up my mind if  I wanted to Mojo or GDP for my monday card, even tho I didn't do it until tue.  

So, for a very long time I have wanted a die cut florish.  And wow did we get what we wanted. Not one but 2 very different sets with florishes in them. I think this florish is gorgeous!

Here is the sketch if your interested:

I was going to use the box and add my die on top, but when I got the die cut It ended up so pretty just like this, I left it.

I think it's pretty self explainatory so you won't have any trouble if you decide to make it.  I did use the retired set of circles as I do not have the new ones just yet, they are on their way actually.  I also used a silver marker that I believe is retired. We usually get stuff like that at Holiday time.  But I thought white would be too stark.
Colors:  Shimmery White CS, Smoky Slate, Basic Black and Watermelon Wonder.


Sunday, June 26, 2016

Stampin Up, Playing with Blossoms and Bliss


And a happy Sunday to you!  Hubby is gone for the day, so I've been playing. I've been itching to get my hands dirty using Bunch of Blossoms stamps, the Blossoms punch and the Blooms and Bliss DSP, all are just so gorgeous and so much fun to play with.

For awhile I played with the leaves to see how I wanted the 3 step stamping to end up, or even if I wanted all 3.  Or you can just use the leaf outlines stamp on colored paper.

I've seen lots of people who can't seem to find a purple to go with the new Sweet Sugar Plum. That is because it isn't really purple.  I used it with Rich Razzleberry here.  If you look at both colors together, you will notice that Sugar plum is a much lighter color of Rich Razzleberry.  I think it looks gorgeous here.

I was tempted to use the flip side of this DSP, it's so pretty with all kinds of blooms all over in the colors I used here, but I was bothered by the busy aspect and after putting my flower together, I turned it over and found it was so pretty on this side.

Tip for the best way to put your flower together:  Get a silicone mat, put glue down on it, then start layering your flower.  The flower will come right off when you are done.

After my flower was done, I placed it without glue and then stamped in my leaves. I only used the one outline leaf stamp, you can do three with them just like the flowers if you want.
I hope you enjoyed.  I used to do more of my own work without starting with challenges so often, and I seem to be getting back to that some.  I really enjoy it as my mind can just flow. I'm ok as long as it doesn't flow too far.


Thursday, June 23, 2016

Stampin Up, Pals Paper Arts Challenge #306, Hello


This week we have a sketch challenge by non other then our Pals fearless leader, Mary Fish.
Here is the sketch:


This one made me stop and think for a long time.  It's not my normal style, but I do hope you enjoy what I came up with.
I stamped the leaf twice in full then just partial for under the top set.
I made it very simple, used the 1 3/8" circle punch with Pink Pirouette CS. Then I stamped and punched out 3 sets of the Grateful Bunch flowers.  I'd like to point out, if you have not seen the set, the stamp for all three are together in one stamp.   It fits perfect into the punch to do them all at one time.  That is a great time saver.

I used Melon Mambo for the stamping of the flowers, then I used my blender pen to lightly color in the flowers. You just squeeze out a bit of ink onto the inside lid of the ink pad, and dip into that to pick up your color.

I layered them using dimentionals and added the Hello (love that little hello and the font) from Thoughtful Banners.

I used Mini Macaron for the leaves and inked around the white with it as well.

Sure hope you enjoyed this one, thanks for stopping by!


Sunday, June 19, 2016

Stampin Up, Flowers, Flowers, Flowers.


Todays card is one I did for my class.  I'm always looking for some new idea or technique for them, they really keep me on my toes.

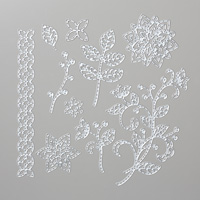
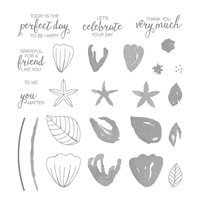
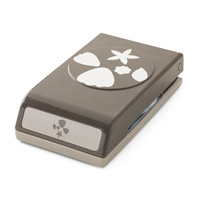
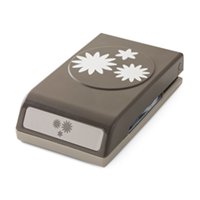
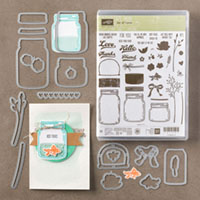
I started thinking about framing something, and this set just seemed to fit the bill.  This is from the Grateful Bunch bundle.  All three sizes of flower are on one stamp, set up to easily cut out at once using the punch.

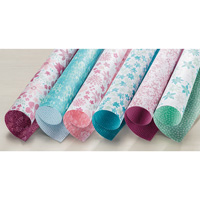
My colors for this are Peek a boo peach, Emerald Envy, Dapper Denim, Perfect plum, Smoky Slate and Black and Whisper white.

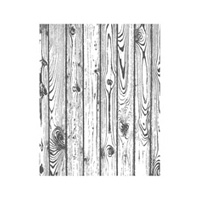
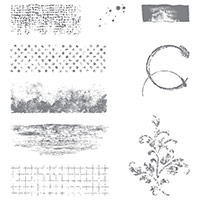
After cutting the base card, I cut a piece of Smoky Slate just a bit smaller.  I used my Hardwood background stamp, stamped off once then stamped onto my paper.   I used the Timeless Textures Stamps to add some texture here and there around the outside edge of the gray.

Then I stamped the leaves just once.  I added the sentiment up toward the top with black ink.

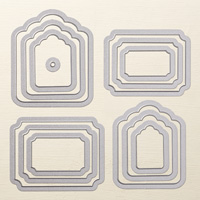
I stamped and punched out all my flowers in 3 colors, then I took my top layer,  and used my trimmer to cut the inside out leaving 1/2" on each edge.  Then I used my blender pens to color the flowers in. It's not necessary, but I love the look.  I scattered the flowers around, some popped up and some not randomly.

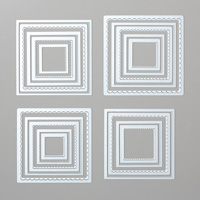
Tip: If you don't have the trimmer or you just feel challenged cutting the middle out, you can take a square die, cut leaving 1/2" or so at top and sides, then after cutting once, slide the die down until it is 1/2" above the bottom and cut again.  That is what I ended up having my class do, it was way easier.

I added some pearls and was done.  Just click on any of the product images below to go to my store.


Thursday, June 16, 2016

Stampin Up, Pals Paper Arts challenge #305, Beautiful Blessing


Wow, it's the middle of June already, where has time gone?  Seems to be passing by so quickly.

Sometime back I posed a little card just using the frame of the rose, you can see that one here:
This was the main card I started with.  The second frame was the result of cutting the rose out and just using the insides to get the colors.

I use a little product called Stick It Adhisive. It's a paper lined on both sides. Very, very thin even with both lining still on.   So can see it at work on youtube.  After you cut your die out it pulls away and is sticky over the whole piece.

I separated the insets and took the backing off one piece at a time and put it in place, like a puzzle.

I've seen it done with many different colors, so go ahead and play with that idea.  So, here are the colors:


Thank you so much for stopping by today.

Click on any of the graphics below to be taken to my store should you want to purchase or check out product.


Monday, June 13, 2016

Stampin Up, GDP040, Case the designer


This week at GDP is a Case the designer, and this week the designer is one of my favorite people, Shawn De Oliveira. 

Isn't this little fishy just too cute in his little jar?  I had a lot of fun with my far and fishy.
Colors:Calypso Corral, Island Indigo, Crumb cake, Pool party.

Island Indigo is my card base, I stamped on my piece of Calypso using the same color ink, with my starfish and sea shell stamps for a bit of texture.   I added one of the new doilies and wrapped the edge around to the back.

To create my jar I stamped the jar and lid on Shimmery White CS, it takes some watercoloring pretty well without coming apart.   I wanted the water to be Pool Party, so after stamping my fish, bubbles, starfish ect, I put a small amount of alcohol in my Aqua brush, (TIP: if you are stamping with dye ink and need to watercolor or sponge over some of the ink, use either an alcohol marker or use alcohol in your brush then add some color. That way the die ink won't run.).

So, I squeezed a bit of color onto the lid of my Pool Party lid and with the alcohol used my Aqua painter to gently brush a bit of color inside my jar to make it look like water.

I used dimentionals to pop up my jar a bit.

The pretty swirles on the side were make using a die and DSP from the By the Shore DSP.

I hope you enjoyed this card and directions. If I wasn't clear, just leave me feedback and I'll post my reply in the comments as well.   Thanks for stopping by.


Saturday, June 11, 2016

Stampin Up, Playing around with new product


The title says it all, I just had to sit down and play. I love this set, Sunshine Wishes Bundle. Tons of sentiments and the die set has words, Sunshine was one of them.  I used the Seaside embossing folder for some texture, I can see it used with the Umbrella set as rain too.  As well as water with the Seaside set.  I love mixing and matching! 

The colors used here are from the new Incolor set, Flirty Flamingo and Dapper Denim along with Whisper White for the card base.
To get the curve for my banner, I used the Have a from the set and placed it, then put the Happy in afterward.

I cut the Sunshine out of a piece from the Subtles DSP stack, I love those stacks, you always have a color of DSP that you need.

I do so hope you enjoyed my saturday card this week, I have not been doing as many cards lately, but have been concentrating on my classes instead.  I shall try to do more.

Have a great week!

Thursday, June 9, 2016

Stampin Up, Pals Paper Arts sketch #304 Sympathy


I rarely post a Sympathy card.  I just do not make them until I need one. I guess I'm always hoping I won't have to  make another one.  But reality is, I'm making more and more of them. So, I decided with the advent of this wonderful sentiment set, to post one for the challenge.

The blue is our new Dapper Denim, I love it! And it is so beautiful with Crumb Cake. Of course most colors go with Crumb Cake, but this one is really nice.   I sure don't know what I'd do without CC, hope it's here for a long, long time.

Colors for this card are, Crumb Cake, Dapper Denim, and Garden Green.

I combined the Heartfelt Sympathy stamp set with the fern from Butterfly Basics and used the Woodgrain embossing folder for one layer.  I stamped the fern on vellum CS and rounded the corners. It seemed to want that.

The sentiment set is cut out using the new Layered square framelits. These are wonderful. 4 sets of framelits to allow you to mix and match scalloped and regular squares, and also you can decide how much room between them you want.  I wanted my scallops to just peek out here.

Thanks for stopping by, I sure hope you enjoyed.