I've decided it would be fun to post a 10 days of Christmas blog event. So, starting on Nov 1, I'll be posting a Christmas card or project every day. That's just 2 days from now. I hope you'll check them out each day and that I can spark an idea for your own cards.
I'll be getting together with friends soon to work on our cards to be sent. I hope to have mine done early this year! Yeah, right! LOL.
So, come on by and please let me know what you like and don't like.

Tuesday, October 30, 2012
Monday, October 29, 2012
A big sale at SU, and Mojo Monday 265
Before I go any further, today and today only Monday, Oct 29th 2012, Stampin Up is having a one day sale like never before, every stamp and stamp set is on sale for 15% off! Exceptions are bundles, wheels and hostess sets. So hurry and place your order right now, just in time for your Christmas cards.
To order from me, go here.
Now, on to Mojo Monday. Love, love, love todays sketches, choices of round or square cards this week.
Here is the sketch.
 Pretty neat huh? Now here is what I came up with early this morning.

To order from me, go here.
Now, on to Mojo Monday. Love, love, love todays sketches, choices of round or square cards this week.
Here is the sketch.

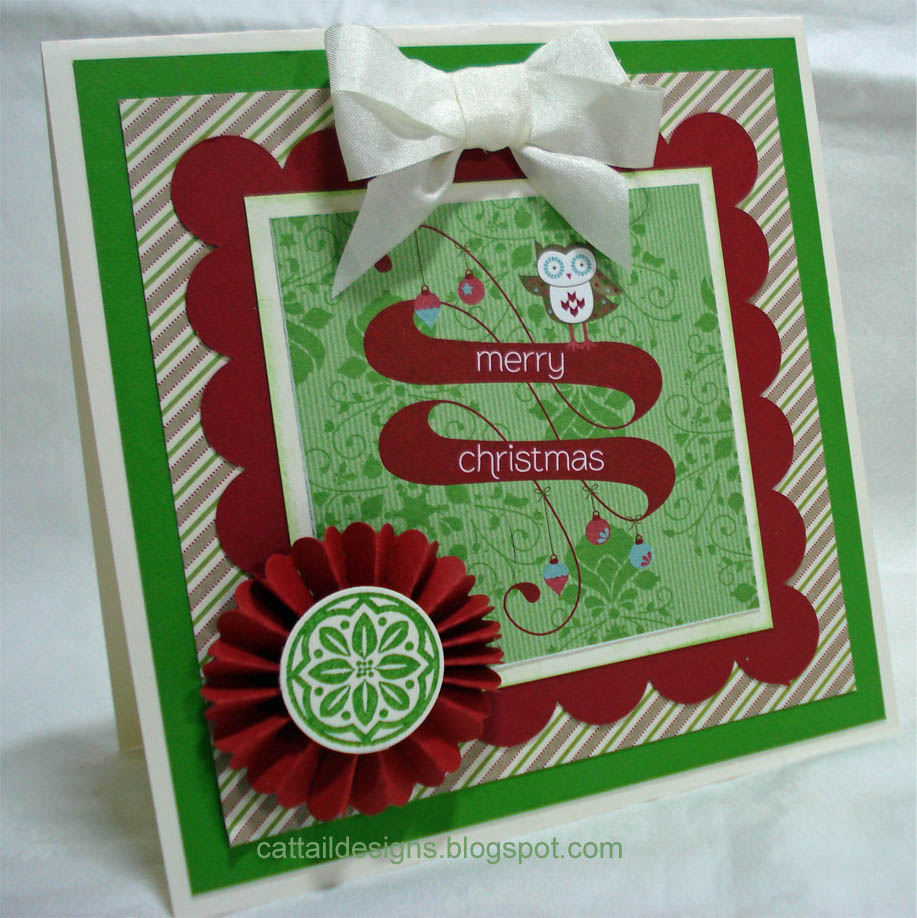
Colors:
Very Vanilla
Gumball green
Cherry Cobbler
Patterned paper:
Festival of Prints DSP (2 sheets in the pack come with a patterned side and a side with decorative squares.)
Snow Festival DSP, (comes in a 6 1/2x4 1/2 inch pad of double sided paper)
Stamp set:
Ornament Keepsakes ( In the Holiday catty) I used it for the small circle on top of the rosette, you can use anything you have.
At the center of this card is a square from Festival of Prints designer paper pack, also in the Holiday catty.
You will find it on my SU site available for download if you don't have it.
So, square card, very vanilla, Snow Festival paper cut to size, 4 3/9 inch scallop square, from the Bigz duo die, square cut of very vanilla with inked edges, then the square from the Festival of prints.
I added the rosette, I cut a 1 in wide by 9 inch long piece of cardstock, scored every 1/4 inch. (Super easy using the brand new SU cutter, avail Nov 1.) fold back and forth at each score, glue ends together. Set the rosette down, push in toward center until it lays flat and use a glue gun to hold right in the center.
Tip: Use the new Silicone mat available in the Holiday catty, the glue will peal right off.
I topped the rosette with the stamped circle, cutting it out with the 1In circle punch, and added the very vanilla seam binding for a bow.
Happy stamping. Thanks for stopping by.
Wednesday, October 24, 2012
Simply elegant
A very simple and effective card, I made this one a birthday card, but it would work for other occasions.
 Colors:
Perfect Plum
Whisper White
Other Elements:
Curly Cute Sentiment
Crochet Trim
Delicate Designs and Adorning Accents embossing Folders
Perfect Plum brads from the Regals Brad pack
All by Stampin Up
I hope you enjoy.
To order Stampin Up, go here:

Perfect Plum
Whisper White
Other Elements:
Curly Cute Sentiment
Crochet Trim
Delicate Designs and Adorning Accents embossing Folders
Perfect Plum brads from the Regals Brad pack
All by Stampin Up
I hope you enjoy.
To order Stampin Up, go here:
Monday, October 22, 2012
Mojo Monday 264
If it's Monday, it's Mojo monday, love mojo monday. What a fun sketch today, I hope you like what I did with it. Here is the sketch
 I just love red and purple together. And I recently bought the Sizzlits Paper Doily, it's too cool.
It makes a fantastic bag topper as well as looking great on cards.
 Colors are
Real Red
Perfect Plum
Very Vanilla
Punches:
Paper Doily Sizzlits
2 1/2" Round
Scallop Trim Border punch
Decorative Label Punch
Boho Blossoms punch
Stamp set:
Blooming with Kindness
And the Perfect Polka Dots Embossing folder
Use 1/2 sheet of Very Vanilla folded over for card, make the next vanilla layer slightly smaller, emboss with the folder, ink edges with Perfect plum.
Layer the doily, then a strip with the border adhired to the bottom, retanglar vanilla piece over that. I used the gold marker in the Holiday Catty for the lines around.
Then layer the circle and stamp sentiment, then punch out of vanilla.
Ribbon (perfect plum grossgrain, retired) and punched out the boho blossoms, layered and added a pearl.
Thanks for looking

It makes a fantastic bag topper as well as looking great on cards.

Real Red
Perfect Plum
Very Vanilla
Punches:
Paper Doily Sizzlits
2 1/2" Round
Scallop Trim Border punch
Decorative Label Punch
Boho Blossoms punch
Stamp set:
Blooming with Kindness
And the Perfect Polka Dots Embossing folder
Use 1/2 sheet of Very Vanilla folded over for card, make the next vanilla layer slightly smaller, emboss with the folder, ink edges with Perfect plum.
Layer the doily, then a strip with the border adhired to the bottom, retanglar vanilla piece over that. I used the gold marker in the Holiday Catty for the lines around.
Then layer the circle and stamp sentiment, then punch out of vanilla.
Ribbon (perfect plum grossgrain, retired) and punched out the boho blossoms, layered and added a pearl.
Thanks for looking
Friday, October 19, 2012
Snow Swirled
I am so sorry, I left you all and have been gone for 3 weeks. We had a great time, attended a rally, saw lots of old and new friends and went lots of places and saw lots of neat stuff.
We had a spot right up front at one campground that was awesome. Every morning and late afternoon the deer would come out looking for food. There was usually at least 18 or 20 of them total, including a couple babies.
Now, back to Stampin Up and making cards and gifts. Snow Swirled caught my attention right off. I love this set, it's so usable. This is a pretty simple card:
 Colors:
Bashful Blue,
Marina Mist,
Whisper White.
Perfect Polka Dots Embossing folder
2 1/2 inch Circle punch
1 3/4 inch scallop punch
Marina Mist Dotted Swiss Ribbon
Decorative Label punch ( cut after first punch and punched again on the other side)
Snow Swirled Stamp Set
Use the snow flake stamps in the stamp set using Bashful Blue on the white paper, then run it through the big shot using the embossing folder. Ink the edge all the way around using either Bashful blue or Marina Mist depending on the look you want.
Cut a piece of the ribbon just a little bit bigger then the size of the white card and apply using glue ( the Snail adhesive works great for this) and wrap the ends of the ribbon under the card. Glue to the Bashful blue card.
Stamp your snowflake using Marina Mist, I used the new foam ink pad and then wet embossed using Clear embossing powder. Cut out using the scallop punch. Cut out the larger circle, ink edges, apply the scallop piece using Stampin Dimensionals, to the large circle. Stamp greeting and apply to corner.
Hope you enjoy this one, I love how it turned out and how simple it is. Have a great weekend.
We had a spot right up front at one campground that was awesome. Every morning and late afternoon the deer would come out looking for food. There was usually at least 18 or 20 of them total, including a couple babies.
Now, back to Stampin Up and making cards and gifts. Snow Swirled caught my attention right off. I love this set, it's so usable. This is a pretty simple card:

Bashful Blue,
Marina Mist,
Whisper White.
Perfect Polka Dots Embossing folder
2 1/2 inch Circle punch
1 3/4 inch scallop punch
Marina Mist Dotted Swiss Ribbon
Decorative Label punch ( cut after first punch and punched again on the other side)
Snow Swirled Stamp Set
Use the snow flake stamps in the stamp set using Bashful Blue on the white paper, then run it through the big shot using the embossing folder. Ink the edge all the way around using either Bashful blue or Marina Mist depending on the look you want.
Cut a piece of the ribbon just a little bit bigger then the size of the white card and apply using glue ( the Snail adhesive works great for this) and wrap the ends of the ribbon under the card. Glue to the Bashful blue card.
Stamp your snowflake using Marina Mist, I used the new foam ink pad and then wet embossed using Clear embossing powder. Cut out using the scallop punch. Cut out the larger circle, ink edges, apply the scallop piece using Stampin Dimensionals, to the large circle. Stamp greeting and apply to corner.
Hope you enjoy this one, I love how it turned out and how simple it is. Have a great weekend.
Wednesday, October 3, 2012
Cupcakes and such
Today I'm not home but I have a cute little birthday card for you. All products from Stampin Up.


Subscribe to:
Posts (Atom)